Orologio

Visualizzazione post con etichetta ricette. Mostra tutti i post

mercoledì 19 marzo 2014

Una torta speciale per la festa del papà - A special cake for the Father's Day

Oggi, per la festa del Papà, ho deciso di fare un piccolo regalo a mio padre. Ogni giorno torna a casa dall'ufficio per una breve pausa pranzo, e spesso le uniche cose che riesce a mangiare - sarebbe più appropriato dire divorare - sono gli avanzi del giorno prima, veloci da riscaldare per non perdere tempo.
 
Ma oggi vorrei che si godesse di più questa giornata, ecco perché gli ho preparato qualcosa non solo diverso dalle solite rimanenze del frigo, ma anche una ricetta che, per quanto rappresenti un classico, in casa mia non è stata mai fatta.
Una bella torta salata con verdure.
 
La torta salata può essere definito come quel piatto un po' "salvavita". Se uno non ha idea di cosa cucinare, basta comprare una bella sfoglia pronta (potete anche farla da voi, dipende dal tempo che avete a disposizione) e condirla a piacere.
Un'altra variante che trovo a dir poco deliziosa, oltre a quella che vi propongo oggi, è a base di porcini, speck e formaggio. Insomma, potrete davvero esprimere al massimo la vostra fantasia.
 
Ecco come procedere per realizzare la torta salata con verdure
 
Ingredienti
 
- 1 rotolo di pasta sfoglia (comprata o realizzata da voi)
- Mezzo peperone rosso
- Mezzo peperone giallo
- 2 zucchine
- 10 pomodorini ciliegini
- Mezzo broccolo
- 1 cipolla
- 80 g di spinaci (van bene anche quelli surgelati)
- 1 uovo
- Parmigiano
- 1/4 bicchiere di latte
- Sale
- Pepe
- 3 cucchiai di olio d' oliva
 
Procedimento
 
Se volete realizzare da voi la pasta sfoglia, ecco cosa fare:
 
Ingredienti: 250 g di farina 00, 150 ml d'acqua fredda, 250 g di burro, 1 pizzico di sale.
 
Come procedere: disponiamo la farina a fontana con al centro l'acqua fredda ed impastare il tutto fino ad ottenere un impasto omogeneo ed un po' colloso. Otteniamone un panetto, realizziamo la classica croce al centro, avvogliamolo nella pellicola trasparente e poniamolo a riposare in frigo per almeno 20/30 minuti.
 
Passato questo tempo, tiriamo fuori il nostro impasto dal frigo e stendiamolo in modo da ottenere una croce con il mattarello su una superficie infarinata. Dopo di chè poniamo al centro del panetto il burro freddo. Chiudiamo i quattro lati della sfoglia sopra al pezzo di burro, facendo una sorta di fagotto.
 
Iniziamo dunque a stendere il tutto con il mattarello sul piano infarinato, fino ad ottenere una sfoglia di forma rettangolare di circa 20x40 cm.
Pieghiamo il risultato tre volte su sé stesso e lo arrotoliamo nella pellicola, per poi porlo in frigo per 30 minuti.
 
Bisogna ripetere questa operazione per circa 5 volte, facendola riposare ogni volta in frigo per una mezz'oretta.
 
Ora forse vi sarà chiaro il mio consiglio di usarne una già pronta . . . come vedete si tratta di un procedimento piuttosto lungo.
 
In ogni caso, una volta realizzata (o comprata) la nostra sfoglia, procediamo con la preparazione della torta salata.
 
Tagliamo finemente la cipolla e poniamola a rosolare con l'olio in una padella piuttosto capiente. Come comincia ad imbiondirsi, aggiungiamo il broccolo tagliato in ciuffetti e i peperoni tagliati a cubetti. Lasciamo cuocere per 5-7 minuti e aggiungiamo anche le zucchine a rondelle e i pomodorini tagliati in spicchi e privati di semi. Dopo altri 5 minuti circa aggiungiamo anche gli spinaci (direttamente se surgelati o precedentemente bolliti per pochi minuti se freschi).
 
Mentre le verdure ultimano la cottura, in una tazza rompiamo l'uovo e lo sbattiamo con due cucchiai abbondanti di parmigiano ed il latte. Versiamo il tutto nella padella con le verdure con l'aggiunta di sale e pepe e mescoliamo per amalgamare bene il tutto.
 
Una volta pronte le verdure, prendiamo una teglia ed adagiamoci sopra della carta da forno con sopra la nostra pasta sfoglia. Assicuriamoci che i bordi della pasta siano abbastanza alti. Bucherelliamo il fondo con una forchetta e versiamoci dentro le verdure. Ripieghiamo dunque i bordi della torta e cospargiamo la superficie con una dose abbondante di parmigiano. Inforniamo poi a 180° per 45 minuti circa.
 
Ed ecco pronta la nostra torta salata alle verdure !


Speriamo Papà Bovo gradisca !
 
Alla prossima e . . . Auguri a tutti i Papà !


Beatrice B.
 
Today, on the Father's Day , I decided to make a small gift for my dad. Every day, he comes home from the office for a short lunch break, and it happens very often that the only thing he can eat is the leftovers food from the day before, quick to heat up, in order to save time.
 
But today I wish he can have a proper lunch, that's why I prepared something  different. A lovely vegetables pie.
 
This kind of pie could be defined as a "lifesaving dish". If you don't have any idea about what to cook for dinner or lunch, you just have to buy a ready puff pastry (if you wish so, you can also make it on your own, but it will take longer) and season it as you prefer.Another delicious way to season it, in addition to the one that I am proposing today, is the one with mushrooms, speck and cheese. Basically, you can really use your immagination.
 
Here's how to make the pie with vegetables
 
Ingredients 
- 1 roll of puff pastry (bought or made ​​on your own)
- Half red pepper
- Half yellow pepper
- 2 courgettes
- 10 cherry tomatoes
- Half broccoli
- 1 onion
- 80 g of spinach (you can use the frozen ones)
- 1 egg
- Parmesan
- 1/4 cup of milk
- Salt
- Pepper
- 3 tablespoons of olive oil
 
Process
 
If you want to make the pastry on your own, here's what to do:
Ingredients: 250 g of White flour 00, 150 ml of cold water, 250 g of butter , 1 pinch of salt.
How to proceed: tahe the flour making a well in the center, and pour in the cold water. Mix it in order to get a smooth and sticky dough. Make a ball and
realize the classical "cross" in the center using a knife and wrap it in the cling film, then place it in the fridge for at least 20/30 minutes.
After this time, pull the dought out from the fridge and roll it out with the rolling pin on a floured surface, in order to obtain a sort of cross. After that, put the butter on the center of the dough. Then close the four sides of the dough above the piece of butter.

So begin to roll the dough out with a rolling pin on a floured surface until you obtain a rectangular sheet of about 20x40 cm .
Bend the result three times on itself and rolled it up in the cling film, then place it in fridge for 30 minutes.
You have to repeat this operation for about 5 times, remember to let it stand in the fridge for half an hour each time.
Now you will probably understand better my advice to use a ready puff pastry . . . as you can see you need a lot of time to make it on your own.
 
In any case, once you have made ​​(or bought) the puff pastry, just proceed with the preparation of the vegetable pie.
Cut the onion and brown it in the oil in a large frying pan. Then add the broccoli and diced peppers. Let them cook for 5-7 minutes then add the courgettes chopped into rings and the cherry tomatoes cut into wedges and without seeds.
After another 5 minutes, add the spinaches (if they're frozen,put them directly in the pan, if fresh, previously boile them for a few minutes) .
While the vegetables are cooking, take a cup and break in the egg and whisk it with two tablespoons of Parmesan cheese and with the milk.
Pour everything into the pan with the vegetables adding salt and pepper. Stir and mix it well .
Once the vegetables are ready, take a baking tin and put in the puff pastry with a sheet of baking paper over. Make sure that the edges of the dough are quite high. Make some holes with a fork at the bottom of the pastry and pour the vegetables inside. Then, turn the edges of the cake  down and sprinkle the surface with a generous amount of parmesan cheese.
Then bake it at 180 ° for about 45 minutes .
 
And here is the vegetables pie !
 
Hopefully Dad will appreciate it . . .
 
Stay tuned and . . . Happy Father's Day !
 
Beatrice B.

venerdì 28 febbraio 2014

Arriva il Carnevale . . . Arrivano le Sfrappole ! - Mardi Gras is coming . . . It's time for Sfrappole !

Il Carnevale è da sempre un'ottima scusa per potersi concedere dolci di ogni genere. Quelle che, però, preferisco tra tutte le delizie carnevalesche sono sicuramente le Sfrappole. Frappe, Chiacchiere, Cenci . . . tanti nomi per descrivere una sola strepitosa ricetta.
Quella che ho deciso di proporvi oggi si basa direttamente sulla ricetta di mia nonna Edda. Ho provato più volte a mangiarne altre, ma nessuna frappa è buona come quelle che fa lei - ovviamente è una cosa che tutte le nipoti dicono delle proprie nonne . . . ma vi assicuro che sono favolose, come del resto tutta la sua cucina.
 
Procediamo dunque !
 
Ingredienti per un bel vassoio (circa 10 persone)
 
- 500 g di farina 00
- 50 g di zucchero
- 2 uova
- 150 ml di arancia spremuta e filtrata
- Olio di semi per friggere
- Zucchero a velo
 
Preparazione
 
Setacciamo la farina e disponiamola insieme allo zucchero a fontana su un piano da lavoro. Rompiamo poi le due uova al centro della fontana, il succo d'arancia e mescoliamo ed impastiamo bene il tutto fino a quando non otterremo una pasta compatta ed elastica.
Formiamone una palla, copriamola nella pellicola trasparente e la facciamo riposare in frigo per una mezz'oretta circa.
Passato questo tempo, tiriamo fuori la pasta dal frigo e cominciamo a stenderla a - mattarello o con la macchina apposita, come ci trovate meglio ! L'importante è che alla fine ne risulti una sfoglia sottilissima (vale sempre la regola del guardare contro luce, dovrà risultare praticamente trasparente).
Una volta stesa bene tutta la pasta, prendiamo un tagliapasta ondulato e ricaviamo delle strisce lunghe una decina di cm e larghe circa cinque.
Come avremo tagliato tutta la pasta, cominciamo a friggere ogni striscia di pasta (leggermente infarinata) in un pentolino con l'olio bollente. Consiglio di friggerne una alla volta. Ogni pezzo sarà pronto quando sarà appena dorato.
Quando avremo fritto tutte le Sfrappole, è molto importante tamponarle bene bene con della carta da cucina, per evitare che siano troppo unte.
Mettiamole quindi su un bel vassoio e passiamo una bella spolverata abbondante di zucchero a velo e . . . ecco pronte le nostre Sfrappole !


Le Sfrappole dovranno essere molto friabili e croccanti. Sono deliziose dopo pasto ma anche semplicemente per merenda.
 
Che dire . . . meno male che c'è la nonna che ci vizia con queste delizie !

Alla prossima
Beatrice B.
 
Mardi Gras is always a good chance to eat all kinds of sweets and confectioneries. But the ones which I definitely prefer above all these delights are "Sfrappole". You can call them in several ways: Frappe, Chiacchiere, Cenci. . . different names to describe one amazing recipe only.Today, I've decided to show you the original recipe of Sfrappole by my Grandmother EddaBelieve me . . . there's no Sfrappola good as the ones that she cooks.

The recipe is the following
 
 Ingredients for about 10 people
 
- 500 g of white flour 00
- 50 g of white sugar- 2 eggs
- 150 ml of orange juice
- Oil for frying
- Icing Sugar
 
Preparing

Put flour and sugar together on a worktable and make a well in the centre of the flour and break the eggs inside. Pour the orange juice  as well and mix everything. Knead it all until you get an elastic mixture.
Roll the pasta in the cling film and let it rest in the fridge for about half an hour.After this time, Take the pasta out from the fridge and start to roll it - you can use a rolling pin or the appropriate machine, as you prefer ! The important thing is that, in the end, the result must be very very thin.
Once you have stretched well all the pasta, let's take a pastry cutter and cut it in order to get strips about 10 cm long and 5 cm large.
As you have cut all the dough, start to fry each strip ( lightly floured ) in a pan with hot oil. I suggest to fry just one strip per time. Each piece will be ready as it starts to get golden.When you will have fried all the Sfrappole, it is very important todry them with kitchen paper, in order to avoid the Sfrappole to be too oily.Then, put them on a pretty dish and sprinkle some icing sugar on the top, and . . . Mardi Gras' Sfrappole are ready !
 
Sfrappole will have to be very crumbly and crunchy. They are delicious after a meal as dessert, but also just for a snack.
 
What can I say . . . Thanks to God, there's Granny, who spoils us with these delights!

Stay Tuned
Beatrice B.
 

venerdì 14 febbraio 2014

San Valentino Made in … Casa – A “homemade” Valentine’s Day

Il giorno di San Valentino è ormai diventato simbolo di consumismo ed eccessivo “miele”, ma, ad essere sincera, io l’ho sempre festeggiato con entusiasmo (sì, sono una romanticona). Ma quest’anno . . . farà ad eccezione. Per via della lontananza, infatti, per me niente cenetta romantica . . . ma non passerò questa serata da sola! Anzi … ci saranno ben due compleanni da celebrare; quello della mia mamma e della mia amica Kristall. Diciamo che anche quest’anno non mi è andata male per niente . . .

Tuttavia non potevo certo non dare il mio contributo a tutte le coppiette che sceglieranno di seguire la tradizione. Il mio consiglio è quello di preparare una cenetta a lume di candela in casa, in maniera tale da soffocarne l’aspetto consumista, ma soprattutto per darvi un tocco intimo e personale. Tra l’altro, presentando qualcosa fatto di propria mano si fa sempre più bella figura!

Il menù che vi propongo è molto semplice, ma di grande effetto. Ho anche provato a pensare a qualcosa di “diverso” dal solito menù che i ristoranti tendono a presentare per quest’occasione … eccolo qua !

Menù di San Valentino 2014
 
Antipasto
Tartare di Manzo con uovo di quaglia e prezzemolo

Primo Piatto
Strangozzi con guanciale e parmigiano

Dolce
Sorbetto di ribes e lamponi

Cominciamo dall’antipasto . . . 

Ingredienti

260 g di filetto di manzo
2 uova di quaglia
1 cucchiaio di capperi
1 scalogno
Prezzemolo fresco
Sale e pepe q.b.
Succo di limone
Olio d’oliva

Preparazione

Tagliamo a pezzetti molto piccoli e sottili il filetto di manzo e lo scalogno e versiamo il tutto in un’insalatiera. Aggiungiamo anche i capperi, un filo d’olio e del succo di limone e mescoliamo bene con un cucchiaio.
Impiattiamo il composto (per l’occasione suggerisco una bella forma a cuore), facendo una leggera depressione al centro della tartare, dove adageremo l’uovo di quaglia crudo.
Spolveriamo entrambi i piatti con una manciata di prezzemolo tritato finemente.

 
Per il primo piatto invece . . .

Ingredienti

200 g di Strangozzi (si tratta di una pasta tipica dell’Umbria, molto simili ai bucatini)
70 g di guanciale a pezzetti
100 ml di panna fresca
Parmigiano Reggiano da grattugiare

Preparazione

Mettiamo su l’acqua per la pasta, portiamola ad ebollizione e saliamo. Cuociamoci gli Strangozzi per circa 12-14 minuti.
Nel frattempo che la pasta cuoce, prendiamo una padella antiaderente per saltare il guanciale a pezzetti. Dopo pochi minuti dovremo togliere parte del grasso risultante dalla cottura del guanciale per rendere il piatto meno pesante. Aggiungiamo la panna fresca e, una volta pronti, anche gli Strangozzi. Saltiamo il tutto in padella per pochi istanti. Non dovrebbe esserci bisogno di aggiungere sale, siccome il guanciale è di per sé molto salato. Suggerisco solo un pizzico di pepe.
Impiattiamo e grattugiamo sopra la pasta il parmigiano a scaglie.


Infine il dolce . . .

Ingredienti

130 g di Lamponi freschi
40 g di Ribes in chicchi
1/4 di banana acerba
1/2 limone senza scorza, semi e parte bianca
50 g di zucchero
100 ml di acqua

Preparazione

Mettiamo tutti gli ingredienti in un frullatore e frulliamo il tutto fino a quando non otterremo un composto omogeneo.
Versiamo il risultato in una bacinella di acciaio e poniamola in congelatore per un’oretta. Estraiamo il composto e mescoliamo per bene con una frusta per rompere i cristalli di ghiaccio e rimettere poi in congelatore. Ripetere l’operazione per circa 3 o 4 volte ogni 60 minuti. Prima di servire, frullare per qualche secondo.

 
Et voilà! Il vostro menù di San Valentino è pronto! Consiglio come abbinamento un vino rosso, tipo un Sangiovese di Romagna, per le prime due portate.

E Buon San Valentino!

Alla prossima
Baci
Beatrice B. 

I love celebrating Valentine's Day (I know . . . I'm so romantic). But this year, I won't have that chance. Because of the distance between my boyfriend and me, there won't be any romantic dinner for me . . . but I won't spend this night alone! Indeed, there'll be two birthdays to celebrate, my mom and my girlfriend Kristall's ones. So  . . . Not to bad ;)
However, I want to give my contribution to all the couples who  will follow this lovely tradition. I suggest to have a homemade dinner, in order to make it personal and cozy. And remember ... when you do something by your own, it's always better!
The menu which I would like to suggest you is very simple to prepare, but very effective as well. I also tried to think about something "different " from the usual proposals that Restaurants normally offer for this occasion. Here it is! 
2014 Valentine's Day Menu
 
Starter
Beef tartare with row quail egg and parsley

Main Course
Strangozzi with lard and parmesan

Dessert
Raspberry and currant sorbet 

Let's start from starter . . .Ingredients

260 g  of beef 's fillet
2 quail eggs
1 tablespoon of capers
1 shallot
Fresh parsley
Salt and pepper
Lemon juice
Olive oil

Preparation

Cut the shallot and the beef's fillet into very small and thin pieces and pour them in a bowl. Then add the capers, a drizzle of olive oil and lemon juice and mix it well with a spoon.
Serve it on the plates (for this occasion I recommend to make a beautiful heart shape), making a slight depression in the center of the tartare, where you have to put the quail egg.
Sprinkle both the dishes with a handful of finely chopped parsley.
For the main course . . .Ingredients

200 g of Strangozzi (this is a typical pasta from Umbria)
70 g of lard into small pieces
100 ml of fresh cream
Parmesan cheese for grating

Preparation

Put the water for the pasta on the flame, let it to a boil, put in salt and cook the Strangozzi for about 12-14 minutes.
While the pasta is cooking, take a pan to fry the lard, cut into small pieces. After a few minutes you'll have to remove some of the fat coming out from cooking the lard, in order to make the dish lighter. Then, add the fresh cream and, as the pasta is ready, add the Strangozzi as well. Stir - fry everything in the pan for a few minutes. You shouldn't need to add any salt, as the lard is salty enough. I suggest to add just a hint of pepper.
Serve it grating the parmesan on the top.
It's time for the dessert . . .

Ingredients


130 g of fresh raspberries
40 g of currants
1/4 of banana
1/2 lemon without peel, seeds and  thewhite part
50 g of sugar
100 ml of water


Preparation

Put all the ingredients in a mixer and mix everything until it becomes homogeneous.
Pour the mixture into a steel bowl and put it in the freezer for an hour. Take it out from the freezer and mix it well in order to break up the ice crystals. Then put it back into the freezer. Repeat  that for about 3 or 4 times every 60 minutes. Before serving, whisk it for a few seconds.


Your Valentine's Day Menu is now ready. Best with a red wine. I suggest a Sangiovese of Romagna.
Happy Valentine's Day!
Stay tuned
Beatrice B.

giovedì 30 gennaio 2014

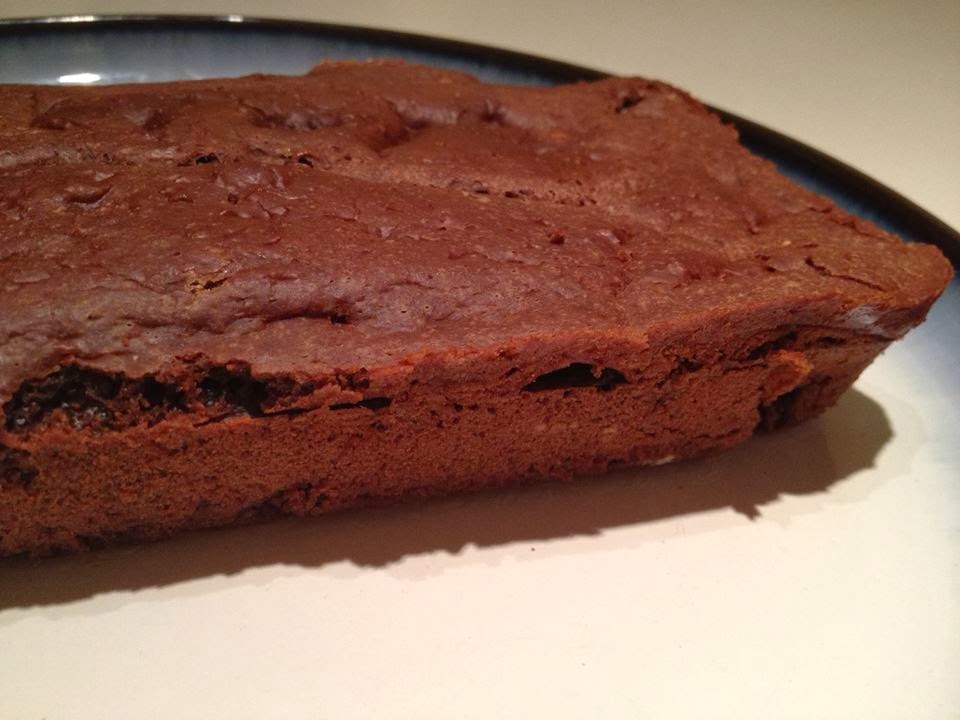
Light, ma con gusto! Pane rustico al latte e cacao - Light, not tasteless! Cocoa and milk bread

Tenere d'occhio la bilancia è tipico di ogni donna (ma perchè gli uomini si fanno sempre meno problemi?), però, dopo settimane di insalatine e pollo, uno potrebbe anche, come dire, "rompersi" un po'... Ma chi l'ha deciso che stare a dieta deve essere per forza doloroso?
Oggi vi propongo una ricetta light ma buonissima: Pane rustico al latte e cacao.
E' leggera perché non contiene né burro né uova, inoltre è semplicissima e molto veloce da preparare.
In realtà la ricetta è nata un po' per caso...Ieri sera avevo una gran voglia di cucinare una torta o simile, ma di uova in casa nemmeno l'ombra, così mi sono arrangiata ed è venuto fuori un risultato inaspettato!
Il latte infatti rende questo dolce particolarmente soffice e spugnoso, una vera delizia!
Ecco qua la ricetta:

Ingredienti

-200 g di farina 00
-100 g di zucchero
-300 ml di latte
-1 bustina di lievito per dolci
-2 cucchiai di cacao in polvere

Procedimento

Prendiamo una terrina, versiamoci dentro il latte e, mescolando con un mestolo e in maniera graduale per evitare di creare grumi, la farina, il lievito e il cacao. Per un risultato sicuro consiglio sempre di passare gli ingredienti al setaccio. Aggiungiamo infine lo zucchero e mescoliamo per bene fino ad ottenere un composto omogeneo.

Prendiamo dunque una casseruola da forno rettangolare coi bordi piuttosto alti, la imburriamo e vi versiamo dentro il composto. Poniamo il tutto in forno a 160° per una mezz'oretta abbondante. Consiglio di fare comunque la prova dello stuzzicadenti, per essere sicuri che sia pronto.

Ed ecco il nostro pane latte e cacao pronto! Semplice no?


E' Ideale da consumare per colazione o merenda, magari con miele o marmellata spalmati sopra, ma anche semplicemente da solo.


Spero abbiate voglia di provarlo anche voi. Come avete visto ci vuole veramente poco tempo!

Baci e alla prossima!
Beatrice B.


Women are obsessed with diet (why men aren't?), but after weeks of salads and chicken only, you could just get enought... We really need to ask to ourselves: "Why do I have to suffer so much for a bloody diet?" Simply, you don't.
Today I want to propose a light but delicious recipe: Milk and Cocoa Bread
It is light because it contains no butter or eggs and it is also very easy and quick to bake. 
Actually this recipe was born perchance ... Last night I had a great desire to bake a cake or a sort of...but since I didn't have any eggs in my fridge and I was too lazy to go out and buy them, I decided to try and  ... I got an unexpected result! 
The milk makes this bread particularly sweet, soft and spongy, just a delight! 
Here's the recipe:

Ingredients 

-200 g of white flour 
-100 g of sugar 
-300 ml of milk 
-1 tablespoon of baking powder 
-2 tablespoons of cocoa powder

Procedure 

Take a bowl, throw in the milk and stir with a wooden spoon adding in flour, baking powder and cocoa in a gradual manner in order to avoid lumps. Then, add the sugar and mix well until you get a smooth mixture.

Take a rectangular baking pan with high edges, butter it and throw in the mixture. Then, place it in the oven at 160 degrees for about half an hour.

And the bread is ready! It's so simple, isn't it?

Lovely for breakfast or as a snack. Try it with honey or jam smeared over. Simply amazing!

Hope you will try it at home. It's just so simple and fast!

Stay tuned
XOXO
Beatrice B.


domenica 26 gennaio 2014

La ricetta della Domenica: Lasagne alla Bolognese - Sunday's recipe:Lasagne with Bolognese sauce

A mio parere, non c'è modo migliore di passare la Domenica di cucinare, e le Lasagne alla Bolognese sono un piatto tipico non solo della mia regione, l'Emilia Romagna, ma proprio della Domenica. Quale nonna o mamma emiliana o romagnola non cucina le Lasagne la Domenica? Si tratta di una ricetta che richiede una lavorazione piuttosto lunga, soprattutto se si utilizzano esclusivamente ingredienti freschi e di propria fattura. Si sa però, che il lavoro sodo ripaga sempre, soprattutto nella qualità!
La ricetta che vi propongo si basa direttamente sulla ricetta della mia nonna paterna (che caso strano è veneta, però vive in emilia da più di 50 anni). Io e il mio ragazzo Mario abbiamo avuto modo di prepararla durante la sfida culinaria contro la Paella spagnola - di cui potete trovare la ricetta nel mio ultimo post - durante lo scorso week-end ad Aberdeen, in Scozia.
Eccola di seguito. Ovviamente vi propongo la versione "lunga" cioè con pasta e ragù fatti in casa e al momento.

Ingredienti per 5 persone circa

Per la Pasta fresca all'uovo
- 500 g di farina di grano tenero 00
- 5 uova
- un pizzico di sale

Per il Ragù:
- 1 carota
- 1 gambo di sedano
- 1 cipolla bianca
- 250 g di macinato bovino
- 250 g di macinato suino
- 500 ml di passata di pomodoro
- 100 g di burro
- Un bicchiere di vino rosso (Consiglio il Sangiovese di Romagna)
- Olio d'oliva
- Sale q.b.
- Pepe

Per la Besciamella:
- 1 l di latte
- 100 g di burro
- 100 g di farina 
- Noce moscata
- Sale q.b.

Più del Parmigiano Reggiano da grattugiare sulle Lasagne

Procedimento

Cominciamo subito con l'ingrediente che richiederà più tempo: il Ragù. Tagliamo a dadini la carota, il sedano e la cipolla. In seguito facciamo sciogliere il burro in un tegame piuttosto ampio (più o meno lo stesso che usate per fare i risotti) e come questo è pronto, aggiungiamo le carote e, dopo due minuti circa, anche il sedano. Una volta passati 7 minuti circa, aggiungiamo infine la cipolla. 
Facciamo passare 15-20 minuti, mescolando spesso per evitare di bruciare le verdure, e aggiungiamo dunque il macinato di carne di maiale e di manzo e sfumiamo con un bicchiere di vino rosso. Dopo due minuti circa aggiungiamo infine la passata di pomodoro. 
Mettiamo la fiamma a fuoco basso e copriamo il tegame con un coperchio. Facciamo cuocere il ragù per almeno 2 ore, controllando e mescolando il tutto di tanto in tanto.

Mentre il ragù cuoce, facciamoci avanti con la pasta fresca. Disponiamo la farina a fontana su un piano, facciamo un buco al centro e rompiamoci le uova dentro, eventualmente si può aggiungere anche un pizzico di sale. Dopo di che cominciamo ad impastare, facendo attenzione a non fare uscire le uova dalla fontana. Si continua ad impastare fino a quando non avremo ottenuto un composto ben amalgamato, di colore giallo e bello sodo. Di solito ne faccio una bella pallina, la incarto nella pellicola trasparente e la metto in frigo a riposare una mezz'oretta.

Nel frattempo che la pasta riposa, prepariamo la Besciamella. Prendiamo dunque un pentolino, mettiamolo sulla fiamma e sciogliamoci dentro il burro. Dopo di che vi aggiungiamo il latte e, setacciandola per evitare di fare grumi, versiamoci dentro, in maniera graduale, anche la farina, senza smettere di mescolare. Si continua a mescolare su fiamma media fino a quando non otterremo un composto piuttosto denso. Infine aggiungiamo un pizzico di noce moscata e aggiustiamo di sale.

Fatta la besciamella, è ora di stendere la nostra pasta all'uovo. Se avete a disposizione la macchina per stendere la pasta...ben per voi! Sarà tutto più facile. Purtroppo ad Aberdeen noi non avevamo questa fortuna, tuttavia avevo comunque un braccio forte da utilizzare...quello del mio ragazzo che si è gentilmente offerto di stendere la pasta a mano con il mattarello...e devo dire che il risultato non aveva nulla da invidiare a quello delle brave azdore romagnole! 


Che dire...sono una donna proprio fortunata!

La pasta dovrà venire molto sottile, quasi da vedervici attraverso se contro luce. Una volta ottenuta una sfoglia del genere, prendete come riferimento la teglia che userete per formare le lasagne e tagliate dei rettangoli di pasta uniformi.

Una volta tagliata tutta la pasta, passiamo finalmente alla composizione della nostra Lasagna! Siccome abbiamo utilizzato della pasta fresca, non avremo bisogno di pre-cuocerla, se invece utilizzate le lasagne "secche", quelle comprate, allora non dimenticatevi di scottarle in acqua bollente prima di porle sulla teglia.
In ogni caso, prendiamo dunque la nostra teglia, la imburriamo e versiamo un primo strato di ragù, poi mettiamoci uno strato di pasta (i rettangoli dovrebbero essere messi in verticale, seguendo ovvero l'altezza della teglia), poi ancora uno di ragù, uno di besciamella e una spolverata di Parmigiano grattugiato. Andiamo avanti così fino a quando non saremo arrivati al limite della teglia. Terminiamo perciò l'ultimo livello con uno strato di pasta, una dose piuttosto abbondante di ragù e tanto tanto parmigiano grattugiato, che servirà a formare una deliziosa crosticina.
Inforniamo il tutto a 160 gradi per un oretta abbondante...Ed ecco la nostra Lasagna alla Bolognese pronta!

So che si tratta di un piatto per così dire..."pesantuccio", ma secondo me poche ricette riescono ad essere così buone! Tra l'altro le Lasagne sono uno dei piatti italiani più amati ed imitati all'estero. Non so quale dei due piatti preferiate tra Paella spagnola e Lasagne alla Bolognese, è una gara davvero dura. Io però sono di parte e voto per questo prodotto nostrano.

Abbinamento consigliato: Sangiovese rosso di Romagna

E ditemi...quale ricetta vi piace preparare, o , meglio, mangiare la Domenica?

Baci baci e alla prossima
Beatrice B.


In my opinion, there's no better way to spend a nice Sunday than cooking, and the Lasagne with Bolognese sauce is a typical dish of my native region, the Emilia Romagna, and we usually cook it on Sunday. Every grandma or mom from Emilia Romagna cook Lasagne on Sunday. It's a recipe that needs a really long process, especially if you want to use the freshest ingredients only. But as you probably know, hard work is always worth, especially if we are talking about quality! 
The recipe which I am now proposing is directly based on the original recipe of my grandmother. My boyfriend Mario and I had the chance to cook it during the occasion of the cooking challenge against the Spanish Paella - which you can find the recipe in my last post - during the last weekend in Aberdeen, Scotland
I am now reporting the "long" version, done with home made egg pasta and meat sauce.
Here it is.

Ingredients for about 5 people

For the fresh egg Pasta: 
- 500 g of  white flour 
- 5 eggs 
- A pinch of salt 

For the Bolognese Sauce
- 1 carrot 
- 1 celery stalk
- 1 white onion 
- 250 g of minced beef 
- 250 g of minced pork 
- 500 ml of tomato sauce 
- 100 g of butter 
- A glass of red wine (I suggest the Sangiovese wine)
- Olive oil 
- Salt
- Pepper 

For the Bechamel Sauce
- 1 l of milk 
- 100 g of butter 
- 100 g of flour 
- Nutmeg 
- Salt. 

Then, some Parmesan to grate on the Lasagne

Cooking Process

Let's start with the ingredient which needs longer to get ready: the Bolognese Sauce . Chop the carrot, the celery and the onion. Then, melt the butter in a large pan ( more or less the same used to make risotto ) and when this is ready, add the carrots and, after two minutes, the celery as well. After 7 minutes, add the onion too.
Spend 15-20 minutes stirring frequently to avoid the vegetables burning, then add the minced pork and beef with a glass of red wine. After about 2 minutes, finally add the tomato sauce.
Put the flame to low and cover the pan. Let the sauce simmer for at least 2 hours, checking and stirring often.

While the sauce is cooking, let's go forward with the fresh pasta. Put the flour on a plan, make a hole in the center and throw the white and yolks of the eggs inside, you can also add a pinch of salt. After that, begin to mix it, being careful to not release the eggs out  rom the flour. Go on to knead it until the mixture is ready, yellow and nice quite hard. I Usually wrap it in a cling film and I put it  in the fridge to rest for half an hour .

Meanwhile, let's cook the Bechamel sauce. So, take a small saucepan and put in the butter to melt. After that, add the milk and the flour, gradually, stirring constantly. Continue to stir over medium heat until you get a thick sauce. Finally add a pinch of nutmeg and salt .

Now it's time to roll out our pasta. If you have the machine to roll out the pasta ... good for you! It will be much easier. Unfortunately, in Aberdeen we did not have this available, however, I still had a strong arm to use ... my boyfriend's one, who has kindly offered to roll the pasta by hand with a rolling pin ... and I really have to admit that the result was simply lovely! He is even better than my grandma!
I know...I am a lucky woman!

The result should be very very thin, you should be able to see it through. Once you have a dough like that one, take as a reference the baking tin you will use to make lasagna and cut the pasta into uniform rectangles.

Once you have cut all the dough, let's make the Lasagne! Since we have used fresh pasta, we don't need to pre-cook it, but if you are using "dry" lasagne, the ones you buy at the grocery, then don't forget to put in boiling water before placing them on the baking tin.
Anyway, take the baking tin, butter it and and pour a first layer of Bolognese sauce, then let a layer of pasta - the rectangles should be placed in a vertical way, following the height of the tin - and then another one of Bolognese sauce, one of bechamel sauce and a sprinkling of grated Parmesan. Go on like this until you arrive at the edge of the tin. Therefore, do the last layer with a layer of pasta, of Bolognese Sauce and a lot of grated Parmesan cheese.
Bake all at 160 degrees for an hour or so... And here is our Lasagne alla Bolognese!

I know it's quite "heavy" dish , but I consider it one of the best italian recipes ever!! Lasagne with Bolognese sauce is actually one of the most loved italian dishes abroad. I don't know which one you prefer between Spanish Paella and Lasagne. It's a really tough challenge. Maybe we can just have both !

Best served with: Red Wine, Sangiovese di Romagna 

And tell me ... which recipe you love to cook, or, better, to eat on Sunday? 

XOXO
Beatrice B.